This is the main class 1 hiking trail that most people take to the summit. Since the entire "climb" is a class 1 trail, it is fully detailed in the Route Description section. Just drive to Whitney Portal, 13 miles west of Lone Pine, CA. Be sure to check the Red Tape section on the main Mount Whitney page.
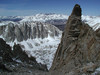
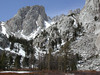
To better organize the photos, the photos in this section are for Whitney Portal to Trail Camp.
Route Description
Basically an 11 mile class 1 trail with several winter / sping variations. If you come during the winter / spring, you may not even notice some parts of the main trail.
Trailhead (Mile 0.0; 8,637') From the trailhead just below the Whitney Portal Store there are a number of large interpretive signs and two sets of bear boxes. It's hard to miss. The trail ascends a number of fairly long switchbacks passing the North Fork of Lone Pine Creek 0.65 miles from the trailhead for those taking the Mountaineer's or any of the East facing routes.
Lone Pine Lake (mile 2.8; 9,420') After passing a log crossing Lone Pine Creek, you will find a sign pointing you to Lone Pine Lake down a short trail to climber's left. Camping is allowed here 200' away from the water. Remember this on climber's left lose the trail on your way down.
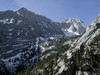
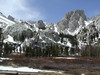
Big Horn Sheep Park (mile 3.5) This is the first main notable area on the hike in and is a large meadow. The trail skirts the south side of this meadow on the way to Outpost Camp.
Outpost Camp (mile 3.8; 10,360') Once you pass Big Horn Sheep Park, the trail will take you right through the middle of Outpost Camp, a wooded camp area just below Mirror Lake with a seasonal solar outhouse. This is a nice place to camp if you are looking for something lower than 12,000'. There is water available from a waterfall in Lone Pine Creek just to the south.
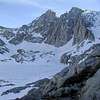
Mirror Lake (mile 4.3, 10,640') Take the trail up climber's right out of Outpost Camp to Mirror Lake. The trail leaves the camp near the outhouse. The lake is a nice area to get water since it is above the camp and offers some excellent views. The enters at the eastern end of the lake and skirts to the south side before ascending some wooded switchbacks on to some exposed granite rocks.
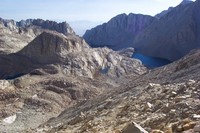
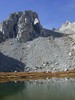
Trailside Meadow (mile 5.3; 11,395) aka Ram Horn Park. Hike up some granite rocks to a meadow or snow covered valley during the winter / spring. The trail actually continues along climber's right (north) side of the meadow. Consultation Lake is the large lake to the south of the trail (climber's left). The trail doesn't actually skirt the lake though it's easy enough to get to.
Trail Camp (mile 6.3; 12,039') This is the main camp for people making 2-day summit attempts via the Trail and for good reason. It is an easy hike to make in a day and it offers short summit hike in the morning. There is a small seasonal lake here where you can filter your water, however, during the winter you may have to melt snow.
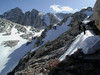
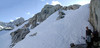
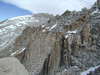
Trail Crest (mile 8.5; 13,777') To get to Trail Crest, you will need to hike the infamous "99 switchbacks" which are clearly viewable from Trail Crest. Once you get to Trail Crest, you will see signs welcoming you to Sequioa National Park. Be prepared for awesome views into the park. From here, you've done the hardest part of the climbing.
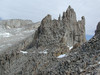
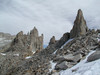
JMT Junction (mile 9.0, 13,480') Once you get to Trail Crest, the trail will drop to an intersection with the JMT from Crabtree Meadows. Take the trail to climber's right and follow the back of Mount Muir and the needles to the summit.
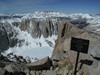
Summit (mile 11.0; 14,497.61') The last part of the climb including the flat-topped summit and summit hut is visible from a long ways away from the JMT Junction. The hut has a register and a 8'x8' restroom. You can also camp on the summit by bringing your tent, however, be aware of lightning as people have died from being struck on the mountain.
Some of the most memorable parts along the trail are: Big Horn Sheep Park, Outpost Camp, Mirror Lake, Trail Camp, Trail Crest, and the summit.
Winter / Spring Variations
When the trail is snow covered, there are several variations to the summer route description that can make the hike faster and / or more pleasant.
Variation 1: At about 10,040' instead of taking the trail up to climber's right to Big Horn Sheep Park, the the snowfield directly up to climber's left. This will bypass Big Horn Sheep Park, Outpost Camp, and Mirror Lake, putting you at the rocky outcropings above Mirror Lake and just before Trailside Meadow.
Variation 2: On the south side of Mirror Lake, instead of taking the trail up the southeast side, directly from the south side of the lake you can ascend a snowslope avoiding the rock hopping.
Variation 3: From the rocky outcroppings above Mirror Lake, the trail along Trailside Meadows actually follow the rocks along climber's right. When there's snow in the meadow and it's not too soft, it can be quicker to simply hike up the meadow directly to Trail Camp.
Variation 4: This is the only winter / spring variation that may be mandatory. Above Trail Camp, go to climber's right of the 99 switchbacks and ascend the low angled snowfield up to Trail Crest. This is really the only area where crampons and an axe may be useful, but often not required. For a speedier descent, you can glissade most of this section. There is a rock ridge in the middle splitting it into two sides and although you can hike up both sides, the natural descent path for glissading takes you to climber's left (skier's right).
NOTE: Often times during the spring, the snow may become very soft during the afternoon which means a lot of post-holing in the area just above Trail Camp and in Trailside Meadow. In these circumstances, hiking in the morning or along the trail (for Trailside Meadow) may be faster.
Essential Gear
Nothing during the summer. During the winter and spring snowshoes are useful for the approach. Crampons and a mountaineering axe may be useful from Trail Camp to Trail Crest.
Miscellaneous Info
If you have information about this route that doesn't pertain to any of the other sections, please add it here.
 Sequoia/Kings Canyon NP


.jpg)
.jpg)
.jpg)